
 Tweet
Tweet
** NOTE **
THE BTK IS NO LONGER AVAILABLE
THE BTK IS NO LONGER AVAILABLE
For other back country skiboard touring options please refer to:
This thread is being kept as an archive only:
As we all know, Jack has been in pursuit of a robust, functional and affordable skiboard backcountry touring binding accessory for some time. So much so that his enthusiasm and commitment in the pursuit has become contagious and a number of us became caught up in trying to find a design solution. The BKT which was just made available as a prototype for riders to test, is a result of many design iterations by a team of forum members who collaborated for many months. Jack has posted his on-mountain adventures with a number of the design iterations since last spring and into the summer, risking his own safety to validate the designs. What may not have been obvious is the journey the design took during that time. The following is a photo record of those design iterations in pursuit of the BTK accessory for the Revel8 Receptor binding.
One of Jack�s first semi-successful implementation of a touring kit on a non-releasable binding was the use of telemark touring cables on a Zero Pro binding.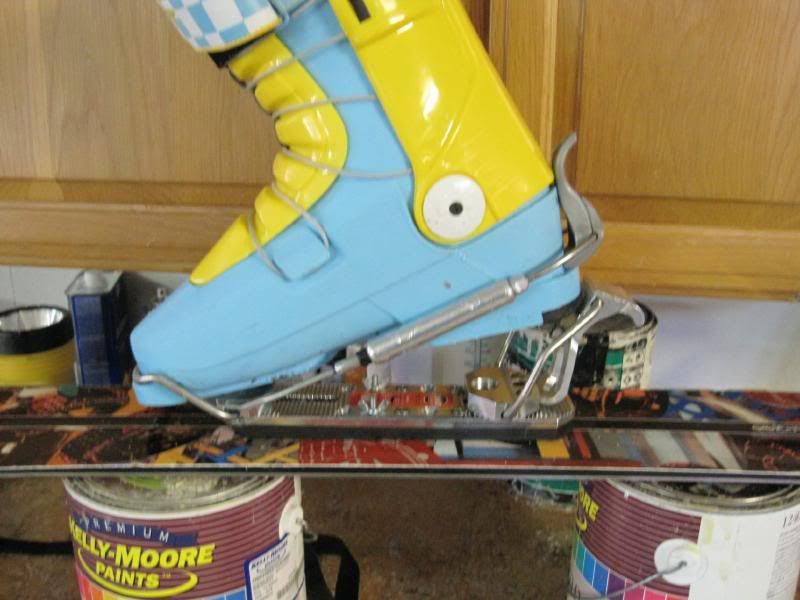
The basics were all in place and this is when the effort gained some traction. The touring cables hooked on the rear bale wires, and the toe lever just happened to be able to pivot into a heel elevator position. But during field testing a shortcoming became evident. The boot could �torque out� under heavy side loading. While it worked somewhat on the Zero Pro, would touring cables also work on the Receptor?
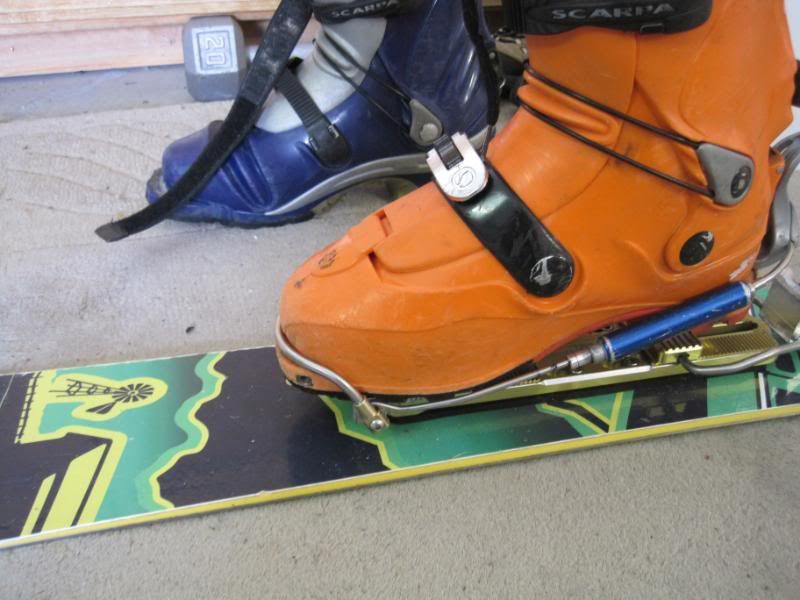
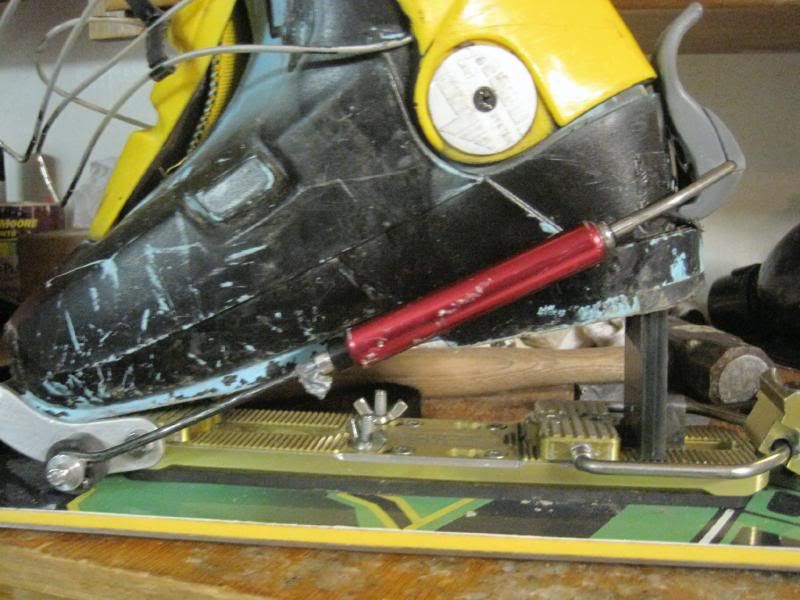
Jack started to experiment with the Receptor binding and touring cable.
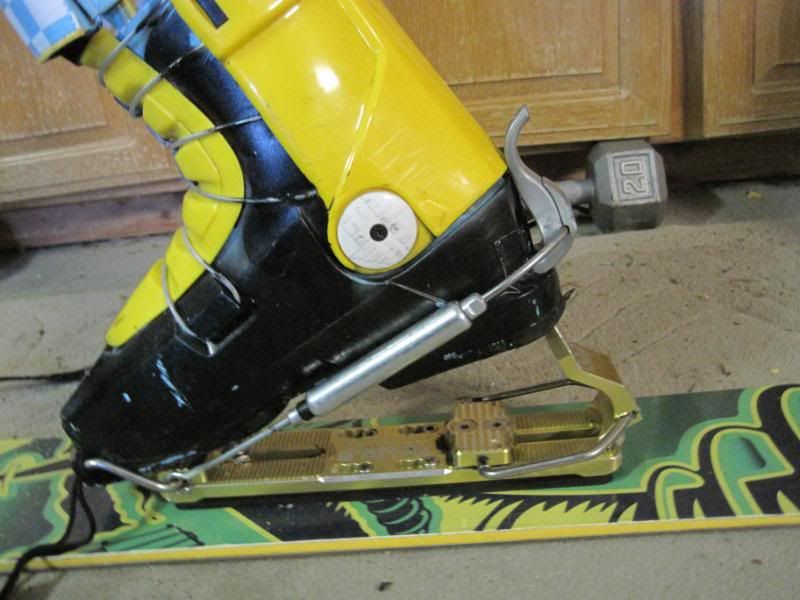
One issue he soon confronted was how to achieve a heel elevator using a toe lever that was cleverly designed to not pivot a full 360 degrees and thereby not require a toe stop screw? Not a problem for Jack. He soon fitted the Receptor binding with the Zero Pro toe lever and bale wire and he was off field testing.
Just as when touring cables were used on the Zero Pros, the Receptor with touring cables mounted directly to the bale wires resulted in boot torque out in difficult terrain.
To understand how to control boot torque out, we started to study the telemark ski bindings that the touring cables are normally used on.
It was obvious that we needed to better constrain the hooks and the sides of the ski boot�s toe to prevent torque out.
A number of design concepts were generated. One of the earliest was Bill�s replacement rear binding block and bale wire that secured the touring cable hooks and created a binding block that the boot sole easily pivoted over because of the generous radius on the front of the binding block.

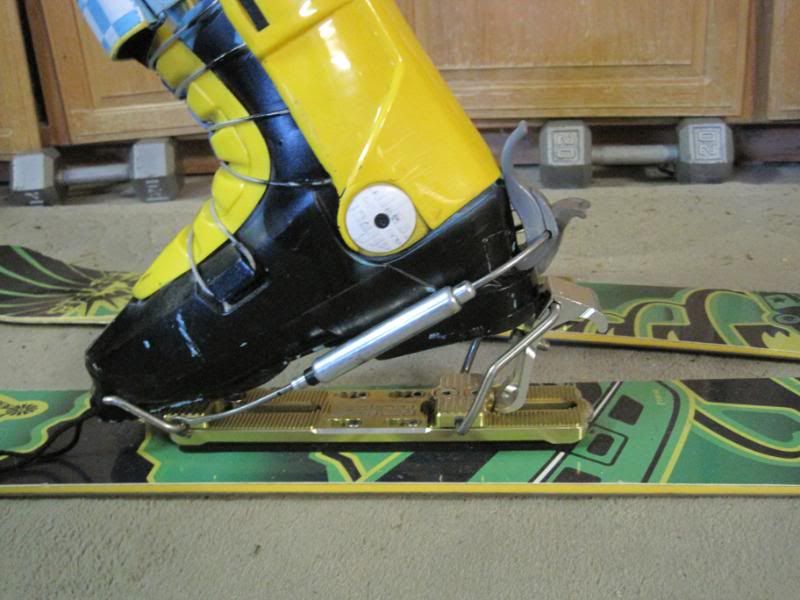
Another design concept that was mocked up and tested on the Zero Pro was the use of add-on nylon bocks on the rear bale wire to limit ski boot toe movement.
The design also incorporated elements of the pivot bushing that Bill had implemented to secure the touring cable hook. In Jack�s field testing the combination of securing the touring cable hooks and limiting the ski boot�s toe movement proved to solve the boot torque out issue previously experienced.
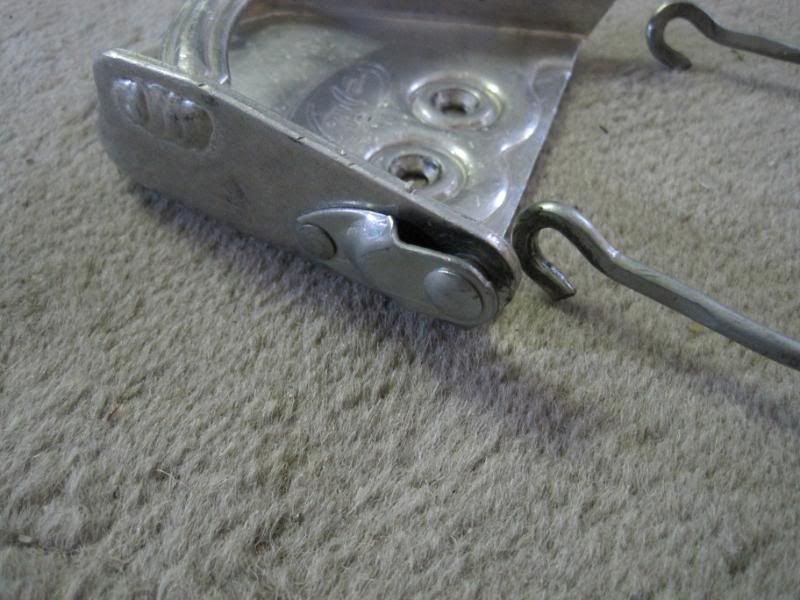
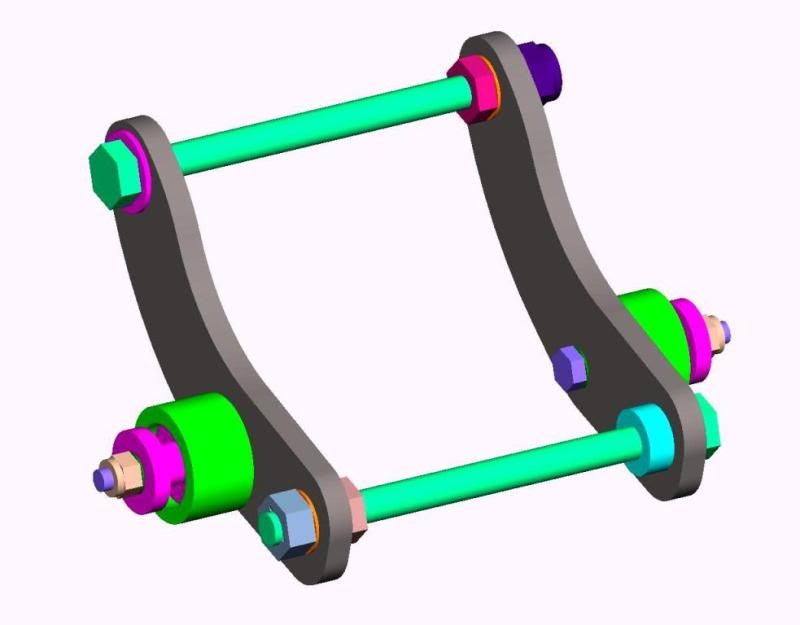
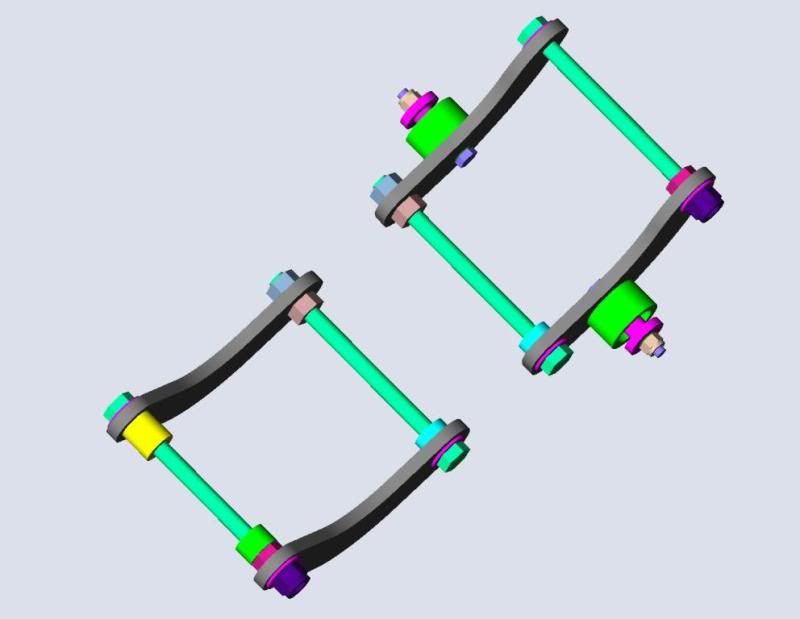
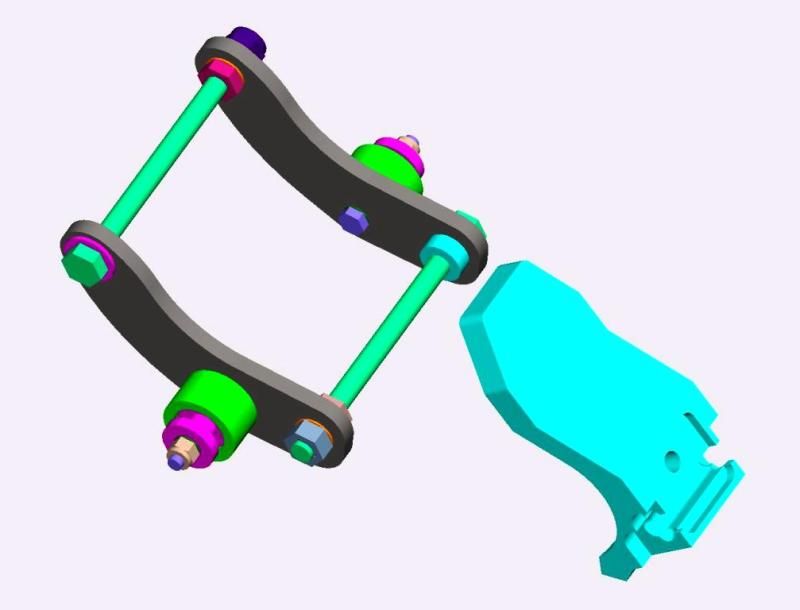
At this point we knew that to have a robust design for ascent using a non-release skiboard binding, we needed a pivot bushing to limit the sideway movement of the touring cables. We also knew that the toe of the ski boot had to be restrained from twisting in the bale. The challenge then became how to achieve these features with a cost effective add-on accessory for the Receptor binding. During a subsequent brainstorming session, the toggle assembly concept was conceived.
Field testing of the initial toggle assemblies demonstrated that it performed as required and anticipated, but keeping the fasteners secure would be a challenge since the use of conventional lock nuts was inadequate. Brainstorming once again resulted in a solution; double nuts.
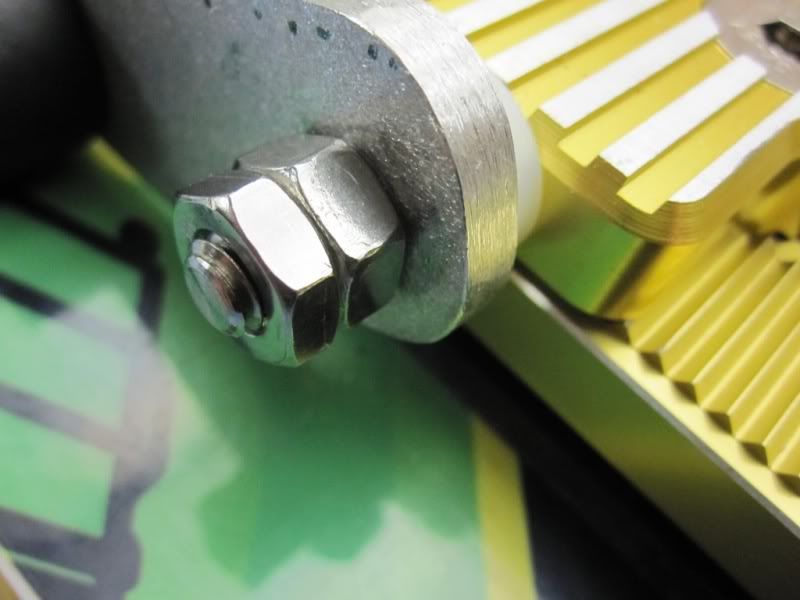
Unfortunately the use of double nuts meant that standard length bolts could no longer be used and it introduced a potential interference problem with the touring cable.
Additional team brainstorming provided the solution. Rather than having the second nut on the outside, and since the nut was the same width as a nylon bushing used on the inside of the toggle, the second nut replaced the nylon bushing.
Subsequent field testing verified that the double nut system not only ensured that the toggle assembly remained securely fastened but standard length fasteners could be used.
Another design feature that we stumbled on during this phase was the touring cable hook retainer. A rubber tubular bumper is installed over the pivot bushing to prevent damage to the skiboard�s top sheet in the event that the toggle assembly is over extended. A rubber bumper was cut �too long� in error and partially overlapped the touring cable�s hook when installed on the pivot bushing. We soon realized that if the bumper was cut even longer, it could also serve as a retainer for the touring cable when in descent mode.
At this point, we had a toggle assembly that would replace the rear bale assembly on the Receptor binding. But we still were uncertain on which direction to take for a heel elevator. A number of add-on concepts were fabricated and tested, some of which are:
None of these passed field testing since they had a tendency to �fall down� when loaded. The team�s conclusion was that the toe lever did the best job of serving as a heel elevator and it had the benefit of not adding extra weight, but the challenge was to get the Receptor�s lever to pivot into the required position.
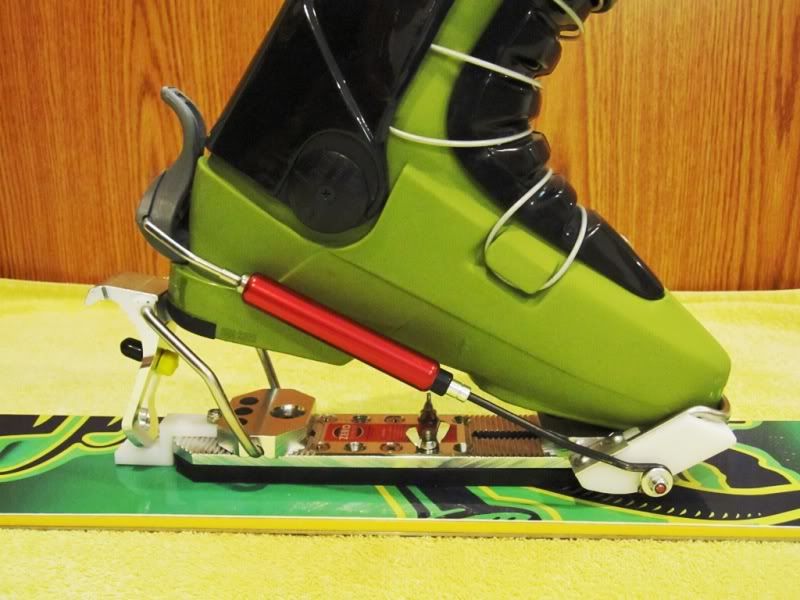
The first attempt to pivot the lever was by replacing the front bale wire with a second longer toggle assembly.

Although this solution tested well in the field, there was extensive discussion on the possibility of the straight bolt potentially bending due to its long unsupported length.
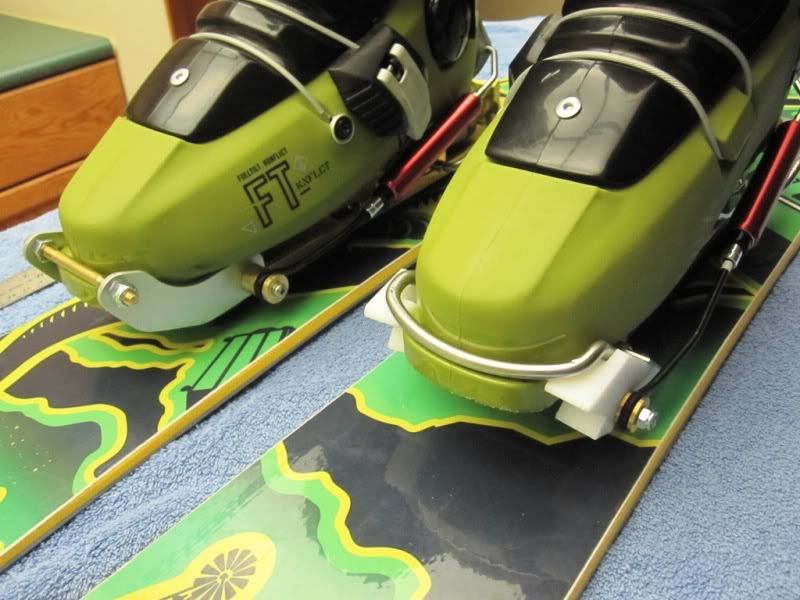
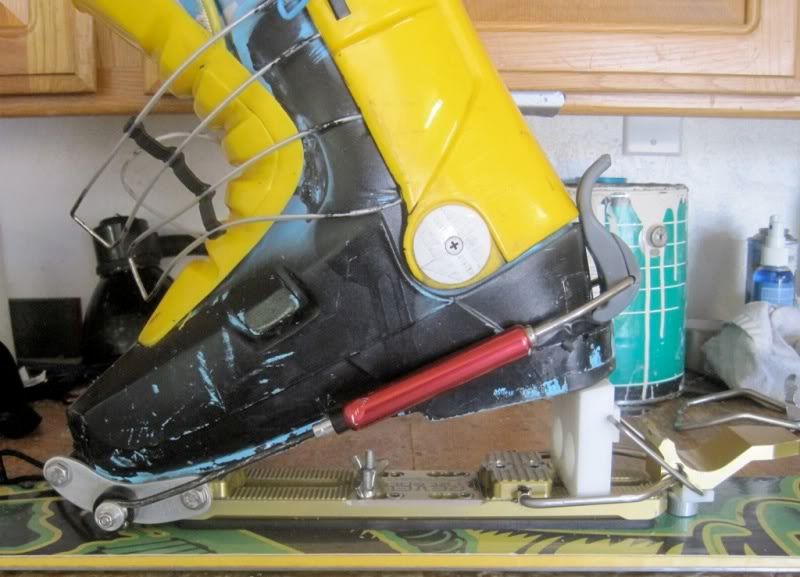
The discussions led to the concept of modifying the toe lever for the touring kit to allow the lever to pivot into the heel elevator position. After carefully examining the interfaces, the extra material that needed to be removed was defined.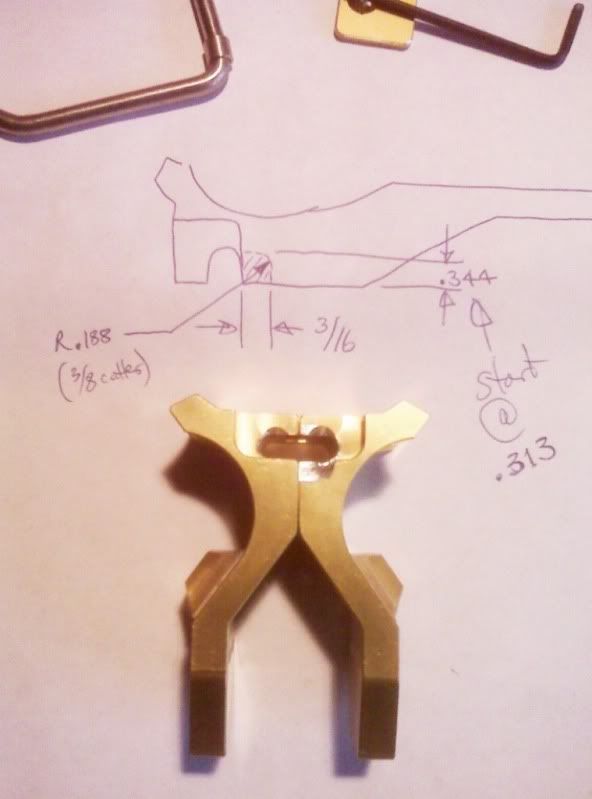
The result met our expectations and avoids the possibility of a bent bolt if the toggle assembly option would be used.
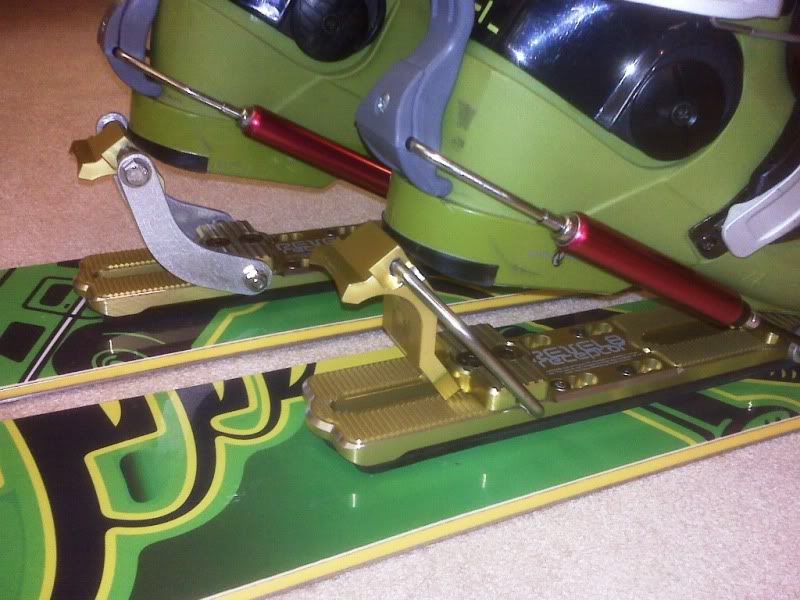
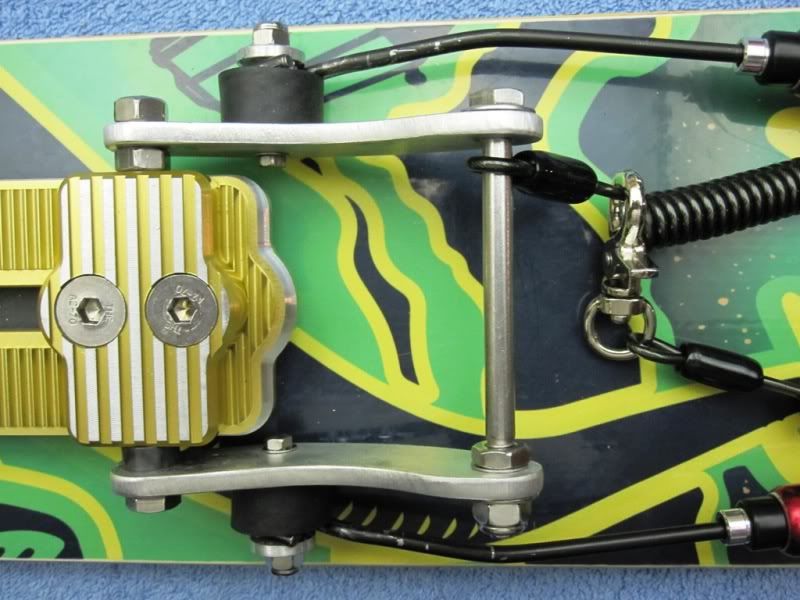
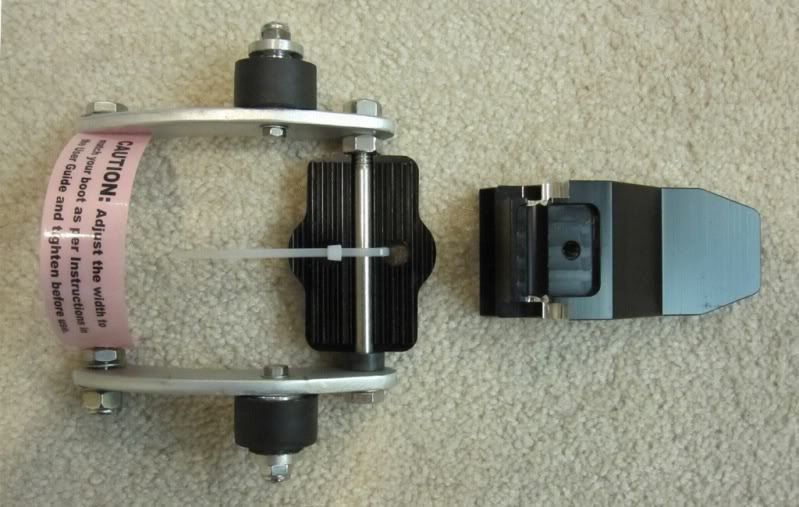
We were now into mid July, and we were able to define the Backcountry Touring Kit components. It would consist of a toggle assembly with pivot bushings for the touring cables that would replace the rear bale and binding block. And a modified toe lever would replace the stock lever.
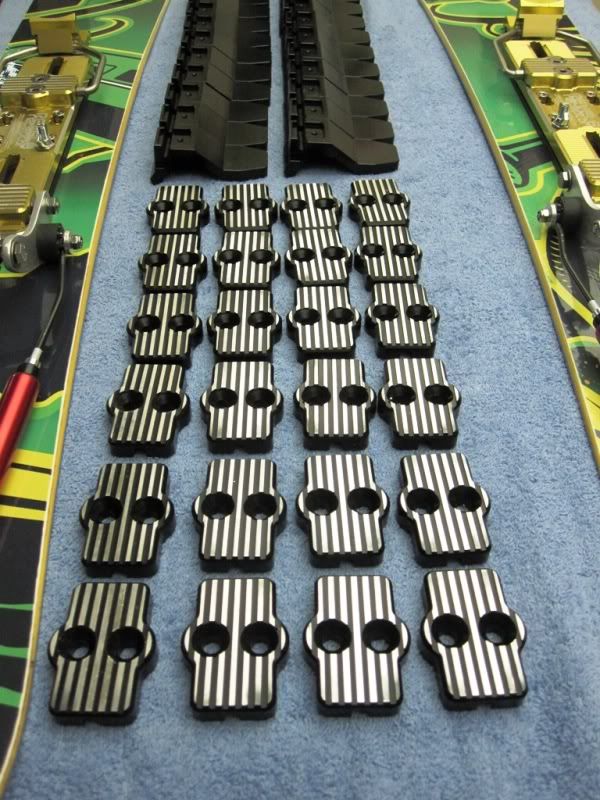
Parts were sourced and items started to arrive. Thru August and September, toggle assembly components were fabricated and a jig was fabricated to hold the toe lever while being machined. In October, the toe levers and binding blocks arrived.
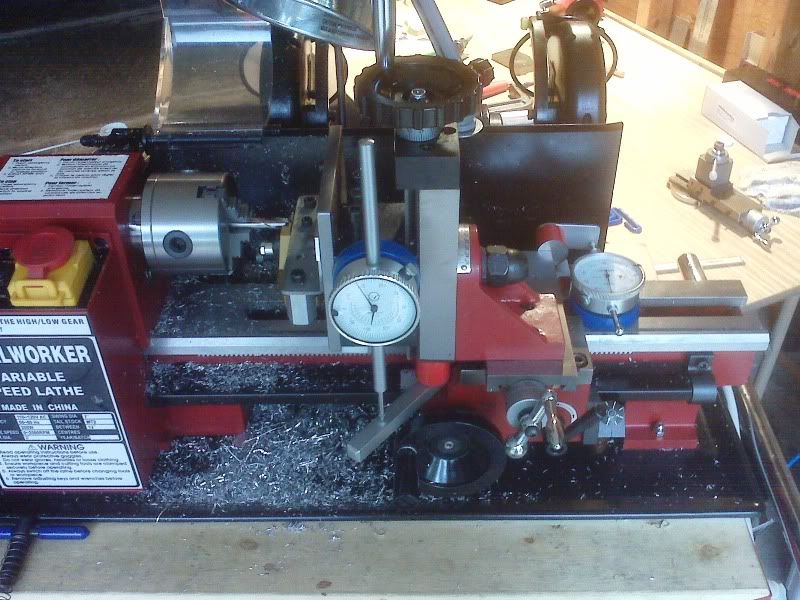
Machining of the toe levers was done on a milling attachment on a mini-lathe.
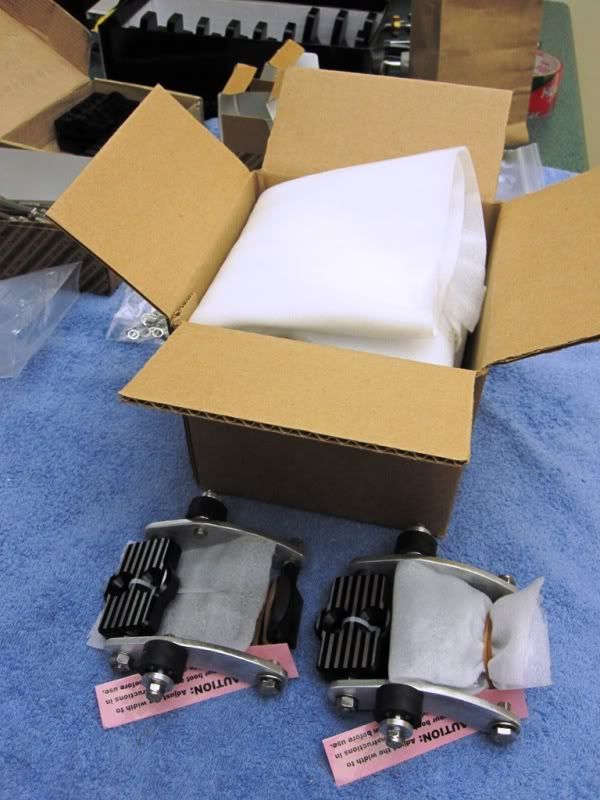
Kits were then assembled.
And the kits are now ready for volunteer test riders.
The project has been a lot of fun for the design team and the team appreciates the generosity of those that supported our effort. Thank you for your support.
If you are interested in testing one of the limited number of prototype Backcountry Tour Kits, please check out this thread: http://www.skiboardsonline.com/vbull...ad.php?t=10461
http://www.skiboardsonline.com/forums/showthread.php?t=11149&highlight=back+country
http://www.skiboardsonline.com/forums/showthread.php?t=12186&highlight=soft+boot+touring
http://www.skiboardsonline.com/forums/showthread.php?t=13045
http://www.skiboardsonline.com/forums/showthread.php?t=12186&highlight=soft+boot+touring
http://www.skiboardsonline.com/forums/showthread.php?t=13045
This thread is being kept as an archive only:
As we all know, Jack has been in pursuit of a robust, functional and affordable skiboard backcountry touring binding accessory for some time. So much so that his enthusiasm and commitment in the pursuit has become contagious and a number of us became caught up in trying to find a design solution. The BKT which was just made available as a prototype for riders to test, is a result of many design iterations by a team of forum members who collaborated for many months. Jack has posted his on-mountain adventures with a number of the design iterations since last spring and into the summer, risking his own safety to validate the designs. What may not have been obvious is the journey the design took during that time. The following is a photo record of those design iterations in pursuit of the BTK accessory for the Revel8 Receptor binding.
One of Jack�s first semi-successful implementation of a touring kit on a non-releasable binding was the use of telemark touring cables on a Zero Pro binding.
The basics were all in place and this is when the effort gained some traction. The touring cables hooked on the rear bale wires, and the toe lever just happened to be able to pivot into a heel elevator position. But during field testing a shortcoming became evident. The boot could �torque out� under heavy side loading. While it worked somewhat on the Zero Pro, would touring cables also work on the Receptor?
Jack started to experiment with the Receptor binding and touring cable.
One issue he soon confronted was how to achieve a heel elevator using a toe lever that was cleverly designed to not pivot a full 360 degrees and thereby not require a toe stop screw? Not a problem for Jack. He soon fitted the Receptor binding with the Zero Pro toe lever and bale wire and he was off field testing.
Just as when touring cables were used on the Zero Pros, the Receptor with touring cables mounted directly to the bale wires resulted in boot torque out in difficult terrain.
To understand how to control boot torque out, we started to study the telemark ski bindings that the touring cables are normally used on.
It was obvious that we needed to better constrain the hooks and the sides of the ski boot�s toe to prevent torque out.
A number of design concepts were generated. One of the earliest was Bill�s replacement rear binding block and bale wire that secured the touring cable hooks and created a binding block that the boot sole easily pivoted over because of the generous radius on the front of the binding block.
Another design concept that was mocked up and tested on the Zero Pro was the use of add-on nylon bocks on the rear bale wire to limit ski boot toe movement.
The design also incorporated elements of the pivot bushing that Bill had implemented to secure the touring cable hook. In Jack�s field testing the combination of securing the touring cable hooks and limiting the ski boot�s toe movement proved to solve the boot torque out issue previously experienced.
At this point we knew that to have a robust design for ascent using a non-release skiboard binding, we needed a pivot bushing to limit the sideway movement of the touring cables. We also knew that the toe of the ski boot had to be restrained from twisting in the bale. The challenge then became how to achieve these features with a cost effective add-on accessory for the Receptor binding. During a subsequent brainstorming session, the toggle assembly concept was conceived.
Field testing of the initial toggle assemblies demonstrated that it performed as required and anticipated, but keeping the fasteners secure would be a challenge since the use of conventional lock nuts was inadequate. Brainstorming once again resulted in a solution; double nuts.
Unfortunately the use of double nuts meant that standard length bolts could no longer be used and it introduced a potential interference problem with the touring cable.
Additional team brainstorming provided the solution. Rather than having the second nut on the outside, and since the nut was the same width as a nylon bushing used on the inside of the toggle, the second nut replaced the nylon bushing.
Subsequent field testing verified that the double nut system not only ensured that the toggle assembly remained securely fastened but standard length fasteners could be used.
Another design feature that we stumbled on during this phase was the touring cable hook retainer. A rubber tubular bumper is installed over the pivot bushing to prevent damage to the skiboard�s top sheet in the event that the toggle assembly is over extended. A rubber bumper was cut �too long� in error and partially overlapped the touring cable�s hook when installed on the pivot bushing. We soon realized that if the bumper was cut even longer, it could also serve as a retainer for the touring cable when in descent mode.
At this point, we had a toggle assembly that would replace the rear bale assembly on the Receptor binding. But we still were uncertain on which direction to take for a heel elevator. A number of add-on concepts were fabricated and tested, some of which are:
None of these passed field testing since they had a tendency to �fall down� when loaded. The team�s conclusion was that the toe lever did the best job of serving as a heel elevator and it had the benefit of not adding extra weight, but the challenge was to get the Receptor�s lever to pivot into the required position.
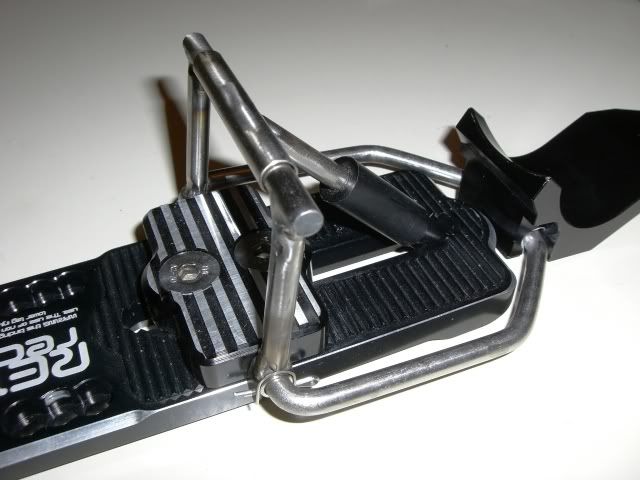
The first attempt to pivot the lever was by replacing the front bale wire with a second longer toggle assembly.
Although this solution tested well in the field, there was extensive discussion on the possibility of the straight bolt potentially bending due to its long unsupported length.
The discussions led to the concept of modifying the toe lever for the touring kit to allow the lever to pivot into the heel elevator position. After carefully examining the interfaces, the extra material that needed to be removed was defined.
The result met our expectations and avoids the possibility of a bent bolt if the toggle assembly option would be used.
We were now into mid July, and we were able to define the Backcountry Touring Kit components. It would consist of a toggle assembly with pivot bushings for the touring cables that would replace the rear bale and binding block. And a modified toe lever would replace the stock lever.
Parts were sourced and items started to arrive. Thru August and September, toggle assembly components were fabricated and a jig was fabricated to hold the toe lever while being machined. In October, the toe levers and binding blocks arrived.
Machining of the toe levers was done on a milling attachment on a mini-lathe.
Kits were then assembled.
And the kits are now ready for volunteer test riders.
The project has been a lot of fun for the design team and the team appreciates the generosity of those that supported our effort. Thank you for your support.
If you are interested in testing one of the limited number of prototype Backcountry Tour Kits, please check out this thread: http://www.skiboardsonline.com/vbull...ad.php?t=10461
Comment