
 Tweet
Tweet
I purchased Intuition Liners at Intuition's office in Vancouver late last season and the liners were heated by Intuition with hot air while in the shell to mold them. I was not happy with the molding because it seemed like they did not mold well around my ankle bones and I had movement vertically when riding resulting in pain from rubbing. So I surfed the web and came across the following directions that I used to remold my liners last weekend. I have to wait until I ride to be sure, but the liners seem to have molded much better to my feet using the oven method described below. Unfortunately I cannot remember where I found it or who the author is.
BTW: I used the Intuition toe cover and thin sock, as well as a 1/16" thick foam pad on my foot at a pressure point. Also, it was NOT hot and painful to put the hot liner on my feet as I had expected.
Here's my cheat sheet for doing Thermoflex/Intuition type liners:
1. Pre-heat oven to 275 F for at least 10 minutes
2. Lower oven temp to 240 F
3. Place a single liner in the oven on aluminum foil on the middle rack
4. Set timer for 10 minutes
5. Place 2x4 (or something at least 2" thick to stand on) on floor
6. Prep boot shell (move buckles to loosest positions)
7. Place toe cap on foot and cover with tight compression stocking (without footbed)
8. When timer goes off remove liner from the oven and note time on clock
9. Place the footbed in the bottom of the liner and ensure it is lined up properly within the liner (centered, ankle placement)
10. Put foot into liner, stand on bare floor while setting liner wrap (inside goes inside)
11. Put foot and liner into boot shell - hold wrap together in front while inserting
12. Pull up gently on the back of liner to remove any wrinkles and set ankle position
13. Double-check wrap (inside/outside flaps at same height) and place tongue into position (for Flexons)
14. Lightly close buckles in this order - middle, bottom, top
15. Set powerstrap and cinch lightly
16. Step onto 2x4 with toes only and drive heel back and down - hold in place, don't move!
17. Do not bang heel into pocket (creates loose heel pocket)
18. Continue pressing/pushing heel back and down while using small amount of forward flex
19. Do not flex hard in the boot yet
20. After 10 minutes of cooling begin flexing forward a bit while keeping heel down hard in the pocket
After 5 more minutes (15 mins. total since removing from oven) the liner may be removed from
the shell to completely cool (but feel the shell and make sure it's not warm to the touch before removing liner).
Do not slip foot out of liner while it's still in the shell. Remove the liner and foot
together, then slip foot out of liner being careful not to compress any areas of the liner.
Allow the liner to completely cool outside of the shell. Then put everything back together, put on a normal ski sock,
and test the fit.
Repeat for second boot.
Note that I don't recommend putting the footbed on your foot directly as shown in the tutorial as it can be prone to some problems - poor alignment of the liner (seams in the wrong places), footbed shifts on the bottom of the foot during insertion. If your footbed is stiff enough then I recommend putting it in the liner first and making sure everything is lined up right.
Don't pull up too much on the back of the liner when setting the heel pocket. This part is critical to getting rid of any wrinkles that may have formed, but pulling too hard can create a loose heel pocket (depends on how many times the liners have been baked).
I like to set my heel pocket by pushing against a wall on a carpeted floor. My boots don't slip backward and I'm able to push downward and backward with good even pressure to create a great heel pocket. I can't stress enough to NOT bang your heels back in the pocket like you might do when putting on boots.
A few things that are not noted but I did that I beleive made it easier:
* I placed 1/8" thick spacers between my toes before putting on the toe cap.
* I taped the toe cap to my foot so it would not move in the liner.
* I used tight fitting cloth mechanics gloves when handling the hot liners. They are like hot jello when heated, so be gentle with them.
* I mounted a binding to a piece of plywood and used two straps to spread the boot shell open. This made it very easy to put the liner with my foot in it into the shell without help from anyone.
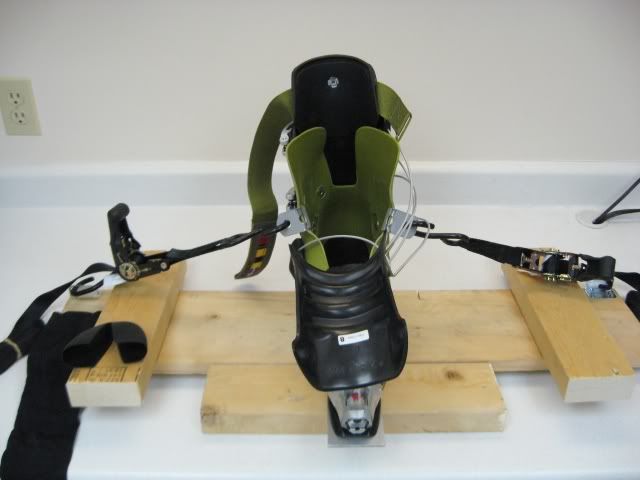
* When I spread the boot, there was an edge of plastic sticking out that I taped to be sure the liner did not catch.
* I sprayed the inside of the shell with silicone spray before putting the hot liner into it. It slid right in.
* I put my 2x4 under the plywood that my binding was mounted to to get the slope described to make a good heal pocket.
I had reservations about doing it myself, but it turned out to be a straight forward process that I suspect most riders would be able to do for themselves.
BTW: I used the Intuition toe cover and thin sock, as well as a 1/16" thick foam pad on my foot at a pressure point. Also, it was NOT hot and painful to put the hot liner on my feet as I had expected.
Here's my cheat sheet for doing Thermoflex/Intuition type liners:
1. Pre-heat oven to 275 F for at least 10 minutes
2. Lower oven temp to 240 F
3. Place a single liner in the oven on aluminum foil on the middle rack
4. Set timer for 10 minutes
5. Place 2x4 (or something at least 2" thick to stand on) on floor
6. Prep boot shell (move buckles to loosest positions)
7. Place toe cap on foot and cover with tight compression stocking (without footbed)
8. When timer goes off remove liner from the oven and note time on clock
9. Place the footbed in the bottom of the liner and ensure it is lined up properly within the liner (centered, ankle placement)
10. Put foot into liner, stand on bare floor while setting liner wrap (inside goes inside)
11. Put foot and liner into boot shell - hold wrap together in front while inserting
12. Pull up gently on the back of liner to remove any wrinkles and set ankle position
13. Double-check wrap (inside/outside flaps at same height) and place tongue into position (for Flexons)
14. Lightly close buckles in this order - middle, bottom, top
15. Set powerstrap and cinch lightly
16. Step onto 2x4 with toes only and drive heel back and down - hold in place, don't move!
17. Do not bang heel into pocket (creates loose heel pocket)
18. Continue pressing/pushing heel back and down while using small amount of forward flex
19. Do not flex hard in the boot yet
20. After 10 minutes of cooling begin flexing forward a bit while keeping heel down hard in the pocket
After 5 more minutes (15 mins. total since removing from oven) the liner may be removed from
the shell to completely cool (but feel the shell and make sure it's not warm to the touch before removing liner).
Do not slip foot out of liner while it's still in the shell. Remove the liner and foot
together, then slip foot out of liner being careful not to compress any areas of the liner.
Allow the liner to completely cool outside of the shell. Then put everything back together, put on a normal ski sock,
and test the fit.
Repeat for second boot.
Note that I don't recommend putting the footbed on your foot directly as shown in the tutorial as it can be prone to some problems - poor alignment of the liner (seams in the wrong places), footbed shifts on the bottom of the foot during insertion. If your footbed is stiff enough then I recommend putting it in the liner first and making sure everything is lined up right.
Don't pull up too much on the back of the liner when setting the heel pocket. This part is critical to getting rid of any wrinkles that may have formed, but pulling too hard can create a loose heel pocket (depends on how many times the liners have been baked).
I like to set my heel pocket by pushing against a wall on a carpeted floor. My boots don't slip backward and I'm able to push downward and backward with good even pressure to create a great heel pocket. I can't stress enough to NOT bang your heels back in the pocket like you might do when putting on boots.
A few things that are not noted but I did that I beleive made it easier:
* I placed 1/8" thick spacers between my toes before putting on the toe cap.
* I taped the toe cap to my foot so it would not move in the liner.
* I used tight fitting cloth mechanics gloves when handling the hot liners. They are like hot jello when heated, so be gentle with them.
* I mounted a binding to a piece of plywood and used two straps to spread the boot shell open. This made it very easy to put the liner with my foot in it into the shell without help from anyone.
* When I spread the boot, there was an edge of plastic sticking out that I taped to be sure the liner did not catch.
* I sprayed the inside of the shell with silicone spray before putting the hot liner into it. It slid right in.
* I put my 2x4 under the plywood that my binding was mounted to to get the slope described to make a good heal pocket.
I had reservations about doing it myself, but it turned out to be a straight forward process that I suspect most riders would be able to do for themselves.


Comment